
MarcoPad: a 3x3 macropad
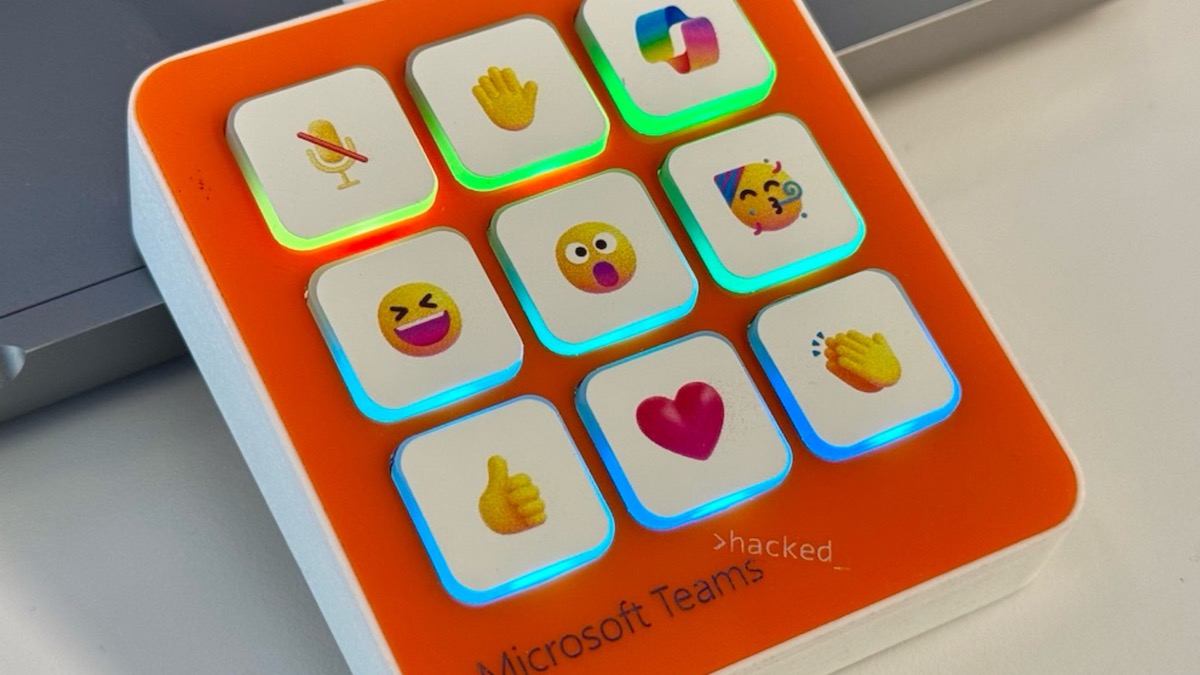
A version of the Marcopad for Microsoft Teams
The Marcopad
The MarcoPad is a compact 3x3 keys macropad built with RP-2040 Zero
It’s built using the RP-2040 Zero as MCU, Choc mechanical keyboard switches, SK6812 MINI-E RGB LEDs for backlighting (optional) and simple discrete electronic components.
The original design is composed of a 3D printed base, a custom PCB, a laser-cut acrylic faceplate, and laser-cut acrylic keycaps.
The excellent QMK Firmware is used to control the function keys and the backlight.
🏆 This project won the 2024 Hackathon Vancouver - Take my money category
If you’re a Microsoft employee you can visit http://aka.ms/teams-macropad and watch the demo.
Built with:
- Bantam Tools Desktop CNC Milling Machine
- Universal Laser Systems Laser Cutter
- KiCAD
- UltiMaker S3 3D Printer
- HAKKO FX-888D Soldering Iron
- Roland BN2-20 printer (sticker)
Hardware
PCB
Component list
- 1x RP-2040 Zero
- 9x Choc
- 9x 1N4148 (DO-35 package) diodes
(Optional) Backlight component list
- 1x 330Ω (SMD package 1206) resistor
- 9x SK6812 MINI-E RGB
- alternativelly WS2812B 6028 can also be used

Base
I’ve custom designed a base which can be 3D printed using PLA, Resin or other materials.
A few metal plates to give it a more premium feel and prevent it from easily slipping on your table.

Faceplate
I’ve custom designed a faceplate for laser cutting.

Key caps
I use the cutouts of the faceplate as keys, but obviously you can design your own keys or adjust the faceplate to fit standard Choc keycaps which are widely available online.
For the key illustrations, I’ve printed images on stickers using the Roland printer.
Disregard the “LED Strip” under the key caps, this was the POC… the final version (PCB picture) uses a much better approach for the backlights.

Software
Initial Setup
The MarcoPad uses the QMK as the firmware to control the function keys and the backlit.
Basic setup
Follow QMK’s instructions for Prerequisites, Preparing your environment and Setting up QMK.
Entering flashing mode
The first time you connect the MarcoPad to your computer, you should see a volume/drive named “RPI-RP2”.
If it’s not showing up, try pressing and holding the BOOT button, then short press the RESET button on the RP2040 Zero.
If the issue persists, your problem might be with the hardware itself, connections, or soldering. Please check everything.
Flashing the firmware
Once installed, go to QMK’s home folder:
qmk cdFlash the firmware:
make marcopad:default:flash✅ Done, your MarcoPad is ready for use.
By default, the keys are mapped to 1-9, try them out to make sure everything works.
Keymap configuration
QMK is very flexible, extensible and configurable. You can explore the QMK’s documentation for advanced setup.
To start you’ll want to at least assign a key/function to each key.
Create a new keymap without backlit
qmk new-keymap -kb marcopad -km [your keymap name]The new keymap is based on the default keymap, without backlit enabled. If you opted for adding backlit, use the next option
Create a new keymap with backlit enabled
cp -r keyboards/marcopad/keymaps/backlit keyboards/marcopad/keymaps/[your keymap name]`
Edit the layout
Edit the keyboards/marcopad/keymaps/[your keymap name]/keymap.c file.
You’ll now replace the key mappings in the following section of the file:
[0] = LAYOUT_ortho_3x3(
                        KC_P7,   KC_P8,   KC_P9,
                        KC_P4,   KC_P5,   KC_P6,
                        KC_P1,   KC_P2,   KC_P3
                     )
For each entry in the “matrix”, replace with one of the available keycodes.
You can also use modifier keys and other QMK features to define the key’s function.
For instance, if you want the bottom-left key (currently KC_P1) to function as “copy”:
Replace KC_P1 with LCMD(KC_C) on macOS or LCTL(KC_C) on Windows.
The “paste” command would be CMD(KC_V) on macOS or LCTL(KC_V) on Windows.
Flash your custom firmware
make marcopad:[your keymap name]:flash✅ Done, your MarcoPad is ready for use